This spring, I was thrilled to find clover growing next to my garlic. I rubbed my hands to think of all the nitrogen being fixed in the soil. (I'm a gardening geek.) But then the yellow flowers came out. It dawned on me that they looked nothing like clover flowers, white or red. This sneaky plant tricked me.
What I had growing in my container was not clover, but oxalis buttercup. (Yes, I just linked to Wikipedia.) Oxalis pes-caprae is an invasive plant and spreads ferociously through tiny bulbs that are difficult to get out of the soil without tilling, and sticky seeds that travel well via animals or cars.
The silver lining is that oxalis leaves have a delicious sour taste. That makes it easy to distinguish from real clover, which isn't sour at all. And best of all, I get to have my revenge on this sneaky weed by eating it in my summer salads. Take that, faker.
A reminder to those who compost - never add weeds that have gone to seed to your compost. That includes oxalis with bulbets in the roots!
Showing posts with label gardening. Show all posts
Showing posts with label gardening. Show all posts
Wednesday, June 20, 2012


Tuesday, May 29, 2012
Self-Watering Containers, part II
Last year, I wrote about building your own self-watering container to grow happy plants. Self-watering containers have a water reservoir at the bottom of the container. Water is wicked up into the dirt, while roots reach down to get at the moisture. Plants grow strong and healthy, and you spend less time watering plants.
I was looking for a more flexible self-watering container than the two large bins I have. I wanted one I can take indoors or outdoors, and that is easy to clean. A plus would be one that is easy to make!
Allison Fastman, author of Cantabrigian Farm Girl, taught a fantastic workshop last summer on indoor gardening projects, including how to create self-watering containers out of Trader Joe's flower buckets. You've probably seen the buckets holding cut flowers. At closing, the buckets are sadly tossed into the dumpster - or better yet, the staff will hold them for you to pick up the next morning. Because the plastic isn't too thick, you can cut through them with scissors, making them easy to work with. So even if you have just a superglue gun and a set of scissors, you can still DIY.
Materials (for one self-watering container):
- 2 flower buckets from Trader Joe's
- Rope (natural, not synthetic)
- Superglue gun and glue sticks
- Weedblocking material
- Scissors
- Optional: hardware cloth, screwdriver
- The rope and weedblocking material are sold in larger quantities than needed. Share with a friend!
Do It Yourself!
1. Start by supergluing rope around the bottom third of one bucket. When you slide this "inner" bucket into the second bucket, the rope will prevent it from fitting completely, allowing space for a water reservoir.
 |
2. Cut a hole in the center bottom of this bucket, large enough to slide rope through. If you are pushing the point of the scissors down to start the hole, add pressure slowly to avoid cracking the plastic. Do I know this from experience? Yes. (I used a combination of scissors and a screwdriver.)

3. Cut weedblocking material to fit in the bottom of the inner bucket, then cut a hole in the center. For structural integrity, you can also add hardware cloth at this point. (The hardware store can cut it down to size for you.) The weedblocking material will keep the dirt in your top bucket and keep it from falling through into the bottom bucket.

4. Tie a knot in the end of another piece of rope, then cut to about 6 inches. Pull the rope through the holes you've just cut in the bucket and weedblocking material. The rope will act as a wick, moving water from the reservoir up into the dirt.

5. Poke two or more holes in the second "outer" bucket, a few inches up from the bottom. The holes should be just below where the bottom of the first bucket will end. If your plants are outdoors, this will prevent them from drowning in a rainstorm.
 |
| The bucket sat too high when empty, but sank lower when filled with dirt. |
6. Fill the bottom bucket with a few inches of water, and the outer with soil. Then, plant! And remember to add water as needed.
 |
| Red Robin cherry tomatoes |
If you need any containers, feel free to ask - I got about 20 from Trader Joe's. Happy planting and let me know how it turns out!
Monday, April 16, 2012
How to Use Compost
As I mentioned in my last compost post, I used my own black gold last fall to shore up my backyard for winter. I dug out the dirt, and stuff that was close to dirt, from the bottom of the compost bin and laid it around plants, finishing it off with a layer of dried leaves. This spring, I wanted to use my home-made compost to replenish the nutrients in my outdoor containers, which I didn't bother to empty this winter. I included some organic fertilizer too, since I know homemade compost doesn't have all the nutrients plants need. Only after I sowed my spinach and pea seeds did I think - wait, didn't I read something about maturing compost?

The Missouri Department of Natural Resources has a nice webpage explaining how to use compost, including the fact that compost should be matured (i.e. aged), as fresh compost can cause problems for your plants. One is that fresh compost can "burn" the plants. The second is that during the process of decomposition, nitrogen is leached out of the soil. It's only after the process is complete that nitrogen can be returned. Oops...
So I decided to make a fifth grade science project. I filled another two containers with store-bought compost and planted the same spinach and peas. Presumably, if the seeds sprout in both, then my compost was mature enough to plant in.
Then I'll make a poster with the results and bring it to the high school gym ;)
The Missouri Department of Natural Resources has a nice webpage explaining how to use compost, including the fact that compost should be matured (i.e. aged), as fresh compost can cause problems for your plants. One is that fresh compost can "burn" the plants. The second is that during the process of decomposition, nitrogen is leached out of the soil. It's only after the process is complete that nitrogen can be returned. Oops...
So I decided to make a fifth grade science project. I filled another two containers with store-bought compost and planted the same spinach and peas. Presumably, if the seeds sprout in both, then my compost was mature enough to plant in.
Then I'll make a poster with the results and bring it to the high school gym ;)
Thursday, November 3, 2011
Black Gold
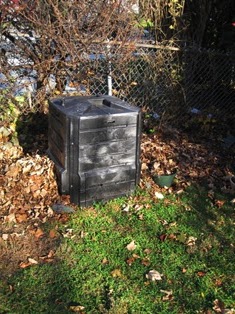
So what does it take?
1. Brown stuff (carbon)
Dry leaves, cardboard, paper printed with soy-based ink, dry hay, wood shavings from your local carpenter... To start your bin, fill it at least halfway with dry leaves. Then begin adding green stuff:
2. Green stuff (nitrogen)
Grass clippings, coffee grounds, egg shells, tea bags, apple cores, bell pepper seeds, that brown pear you just found in the fruit bowl.
3. Water
Too much will drown your bacteria, but too little will kill them too. Sprinkle some water when you add brown stuff, just enough to make dry leaves shiny.
4. Air
Anaerobic bacteria don't need air to eat your trash and convert it to dirt, but they produce ammonia as a waste product (ew) and are slow digesters. To encourage oxygen-eating aerobic bacteria, efficient decay, and a clean smelling compost bin, stir your pile once a week to replenish oxygen supplies.
What to avoid:
- Oil, meat and bones, dairy: Homegrown compost piles are not efficient enough to break these down. Meat and dairy also encourage mice, rats, and even feral cats and dogs to nose around in your bin.
- Pest-infested plants, or weeds that have gone to seed - they'll both love the compost. A little too much.
- Pet poop. Those little droppings can contain parasites or other diseases.
How do I start?
Many cities subsidize compost bins - I got mine from Cambridge for $40, which included a container to collect kitchen trash. You can also build your own - just make sure it's sturdy enough to keep out rats, etc. All you need are four walls, chicken fencing for the bottom, and a cover for the top.
Place the bin in a sunny spot. Throw some twigs in as the bottom layer. They will help keep air flowing to the bottom of your pile. Then throw in a lot of dry brown leaves, sprinkle with water, and start to add green stuff. Simple!

How does it work?
Lots of little critters will start to eat the food.Compost This Book! has a cute illustration showing centipedes, earthworms, snails and beeetles gathered around a dinner table. You can't even see the biggest eaters - bacteria. They all produce waste - nutrient-rich dirt, sometimes called black gold. Don't worry about cultivating pests. The centipedes are so happy in your compost bin, why would they decide to come inside?
Another waste product is heat. The more they eat, the more they heat. A hot compost is a fast compost.
Will it stink?
If your compost stinks, it either needs more air or more brown stuff. Experiment to find a well-balanced diet.
What do I do with it?
Next fall, scoop out the finished, and nearly-finished, compost from the bottom of the bin (store-bought bins come with a sliding door contraption that lets you get at the pile from the bottom) and throw it on your garden, especially around the roots of the plants you want to fertilize. Then cover it with some leaves or hay, and you're set for winter. Even if your compost isn't fully matured (decomposed) right now, it will be by next spring.
I'm a pretty lazy composter because I don't stir the pile very often and often my mix is out of balance. Still, stuff decays. It's pretty amazing to me how my bucketfuls of kitchen crap can shrink down into rich, dark dirt.
Sunday, October 30, 2011
Taking Stock
I started out the year with some spring crops.
Following spring was a fallow period while life got crazy. Then I planted tomatoes (no picture - it was not a tomato year for me) as well as
I attempted to plant a fall crop of spinach but sowed too late, so I revised and planted garlic instead. (That's not technically a 2011 crop, since it'll come up in the spring.)
Not bad growing all this from two of these:
But I bet I can do more next year. :) What did you grow this summer?
 |
| Spinach |
 |
| Mesclun greens |
 |
| Peas |
 |
| And beets. |
 |
| Basil (now pesto) |
 |
| And astonishingly large kohlrabi. |
I attempted to plant a fall crop of spinach but sowed too late, so I revised and planted garlic instead. (That's not technically a 2011 crop, since it'll come up in the spring.)
Not bad growing all this from two of these:
 |
| Self-watering container |
But I bet I can do more next year. :) What did you grow this summer?
Wednesday, May 25, 2011
Garden Snapshots
| Spring peas in the early morning |
| The largest spinach I ever grew! (Note: I have never grown spinach before) |
| Mesclun greens in terra cotta |
Wednesday, February 10, 2010
First Post
I'm a planner by nature - I like to plan everything to the smallest detail. What I am not so good at is follow-through. Friends of mine have told me to tell someone when I plan to go the gym, so I actually go. I am telling the WORLD that I plan to live greener, so I actually do it. How's that for commitment?
This blog will recordmy amateur struggles with composting, gardening, and cooking. I'm looking for advice from those who know better, and I'll share my mistakes with those who don't.
I'll be posting soon about tmy grandiose plans for a suburban garden this spring. Until then, I'm posting a recipe for sweet and sour chicken. It was incredibly easy to prepare and smells sooo good in the oven right now.
Ingredients:
4-8 skinned, deboned chicken breast halves
1 egg, beaten
cornstarch
vegetable oil (or Pam) to fry in.
Sauce:
3/4 cups sugar
4 Tbs. ketchup.
1/2 cup vinegar
1 Tbs. soy sauce
1/2 tsp. garlic powder
Procedure:
Mix all the ingredients for sauce together. Dip chicken breast in egg, roll in cornstarch. Fry in oil (or Pam) until just browned. Place chicken in a shallow baking pan. Pour the sauce over it and bake uncovered at 325 degrees F. for one hour. Turn chicken ever 15 min. Serve with rice!
I'm serving the chicken with orange slices because they're sweet, and because I have them, and with rice, because the recipe said so - with an exclamation mark. Thanks to the University of Hawai'i for the recipe!
This blog will recordmy amateur struggles with composting, gardening, and cooking. I'm looking for advice from those who know better, and I'll share my mistakes with those who don't.
I'll be posting soon about tmy grandiose plans for a suburban garden this spring. Until then, I'm posting a recipe for sweet and sour chicken. It was incredibly easy to prepare and smells sooo good in the oven right now.
Ingredients:
4-8 skinned, deboned chicken breast halves
1 egg, beaten
cornstarch
vegetable oil (or Pam) to fry in.
Sauce:
3/4 cups sugar
4 Tbs. ketchup.
1/2 cup vinegar
1 Tbs. soy sauce
1/2 tsp. garlic powder
Procedure:
Mix all the ingredients for sauce together. Dip chicken breast in egg, roll in cornstarch. Fry in oil (or Pam) until just browned. Place chicken in a shallow baking pan. Pour the sauce over it and bake uncovered at 325 degrees F. for one hour. Turn chicken ever 15 min. Serve with rice!
I'm serving the chicken with orange slices because they're sweet, and because I have them, and with rice, because the recipe said so - with an exclamation mark. Thanks to the University of Hawai'i for the recipe!
Subscribe to:
Posts (Atom)